

DIY Assembly Guide: DELGREEN 12V 628Ah LiFePO4 Battery Kit
Blog Intro
If you’re building off-grid solar storage, RV power systems, or heavy-duty 12V energy backup, this all-in-one 4S 628Ah LiFePO4 kit is a game-changer. Unlike messy custom builds that require separate sourcing of enclosures, BMS, busbars and wiring, this pre-packaged DELGREEN kit includes every component you need for a safe, high-capacity lithium iron phosphate battery pack.
In this step-by-step blog, we’ll walk through the full assembly workflow, critical wiring safety tips, and JK BMS app configuration to get your 12V 628Ah battery operational. This guide is beginner-friendly but covers professional torque and insulation standards for long-term reliability.
What’s Included in the 12V 628Ah Kit
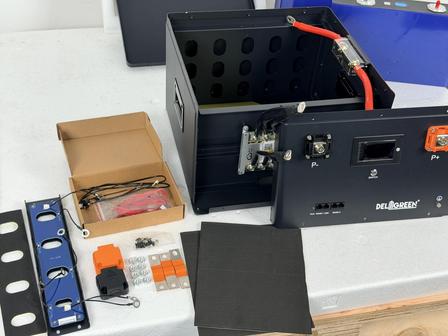
Full kit components laid out
- Heavy-duty metal battery enclosure
- 4×628Ah LiFePO4 prismatic cells
- JK 4S smart BMS board
- Central PCB balance board
- LCD display screen
- Copper connecting busbars, stainless mounting screws & washers
- High-current red/black silicone cables
- Safety fuse assembly
- Insulating epoxy boards & EVA foam insulation strips
- NTC temperature sensor wire
- Front panel with P+/P- heavy terminals, power switch, RS485 communication ports
Critical Pre-Assembly Safety Notes
- Always wear insulated gloves; avoid shorting cell terminals with metal tools.
- Double-check all polarity before connecting main positive/negative cables—reverse wiring will destroy the BMS.
- Torque all terminal bolts to standard torque value to prevent hot spots from loose connections.
- Route all thin sensor wires away from thick high-current cables to avoid signal interference.
- Never plug the balance PCB connector misaligned; misinsertion burns out the circuit board instantly.
Step 1: Prep the Enclosure with Full Insulation
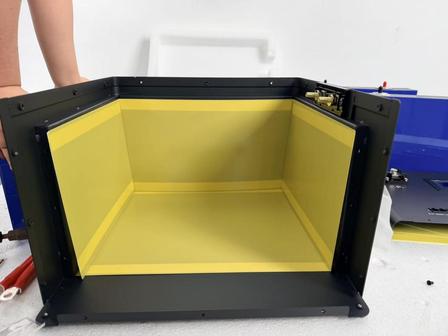
Case lined with yellow epoxy insulation
- Remove the front terminal panel from the metal housing by unscrewing all perimeter bolts.
- Line all inner walls of the enclosure with yellow insulating epoxy sheets to create a full dielectric barrier between metal casing and cells. This eliminates risk of internal short circuits.
- Cut EVA foam strips for spacing between individual cells (for vibration damping and thermal separation) and set them aside for later placement.
Step 2: Load 4×628Ah LiFePO4 Cells (4S Series Configuration)
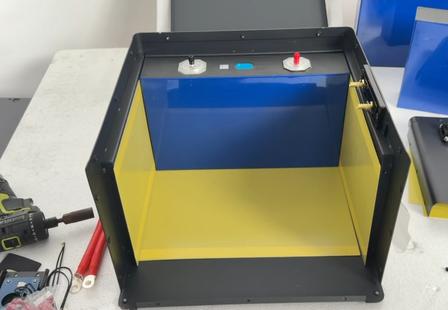
Empty insulated case ready for cells
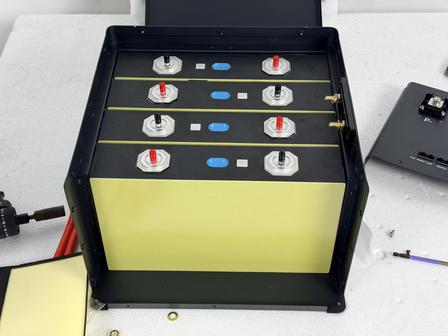
4 cells fully seated in series layout
- Place the four 628Ah prismatic cells into the enclosure in strict alternating positive/negative series order.
- Slide pre-cut EVA foam epoxy strips between every cell to cushion vibration and isolate heat transfer between modules.
- Confirm terminal layout: The far-right terminal of the first cell marks the total pack POSITIVE (P+). The last cell terminal closest to the BMS mounting area is the total pack NEGATIVE (P-). Mark these two positions with a marker for later main cable connections.
Step 3: Mount Front Panel & Prep BMS Hardware
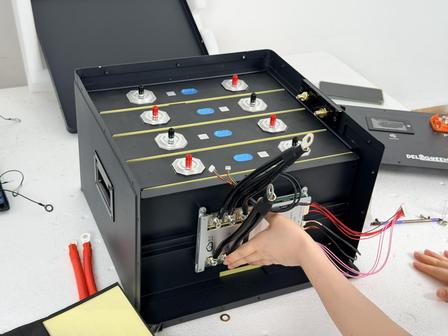
Front panel reinstalled, BMS pre-mounted
- Reattach the front terminal panel and fully tighten all mounting screws to secure it to the metal box frame.
- Mount the JK smart BMS board to the designated bracket on the lower front of the enclosure. Apply thin EVA foam insulation under the BMS base before screwing it down to prevent metal contact and vibration noise.
Step 4: Install Central Balance PCB & Connect Cell Busbars
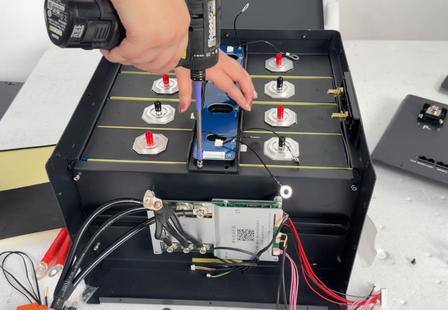
Securing central PCB with drill
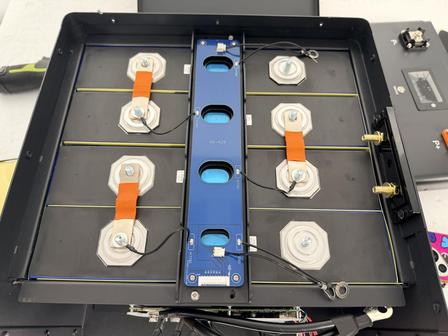
Busbars & balance sensor wires installed
- Position the blue central balance PCB centered across the four cells, fasten it to the enclosure floor with screws.
- Attach copper busbars to link adjacent cell positive/negative terminals in series.
- Route thin balance sensor wires from each cell stud to the matching ports on the central PCB.
- Mount the NTC temperature sensor wire to the total negative cell terminal for pack thermal monitoring.
- Torque every busbar bolt evenly with a torque wrench to ensure zero loose contact resistance.
Step 5: Install Safety Fuse & Wire Main Positive (P+) Cable
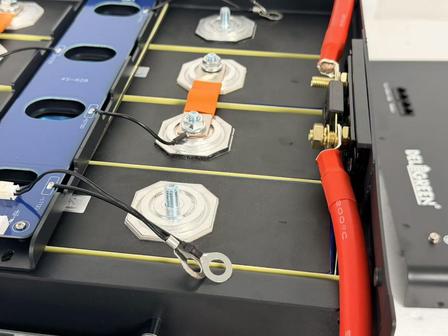
Fuse assembly on P+ path
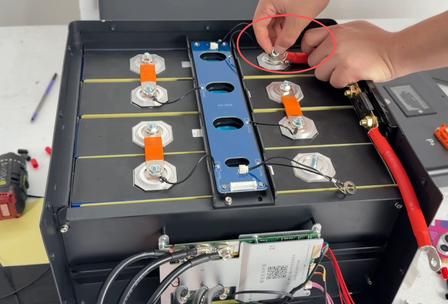
Connect main positive high-current cable
- Mount the fuse block on the front panel’s P+ terminal channel—this mandatory safety component cuts power during overcurrent events.
- Run the thick red main positive cable from the marked total positive cell terminal to the fuse block, then to the external P+ terminal on the front panel. Tighten all terminal lugs with torque tools.
Step 6: Run Main Negative (P-) Cable & Front Panel Wiring
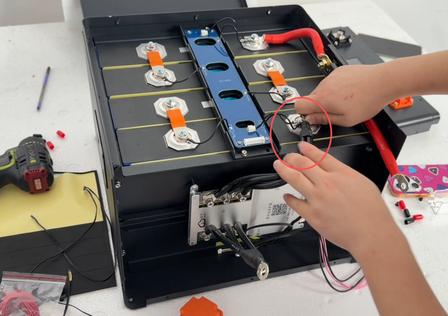
Main negative cable connection
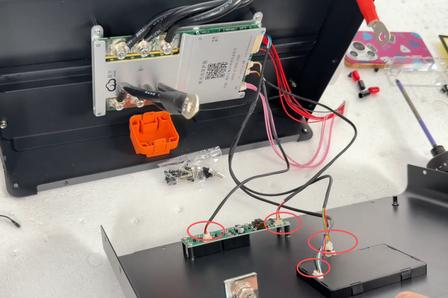
LCD, switch & communication wiring harness
- Attach the thick black main negative cable to the marked total negative cell terminal, route it to the front panel’s external P- terminal.
- Plug all low-voltage harnesses to the front panel sub-board:
- LCD display screen ribbon cable
- Physical power switch wire
- RS485 communication port wiring
- Organize all thin signal wires neatly away from thick power cables to avoid electrical noise interference.
Step 7: Final PCB Balance Wire Connection (High-Risk Step!)
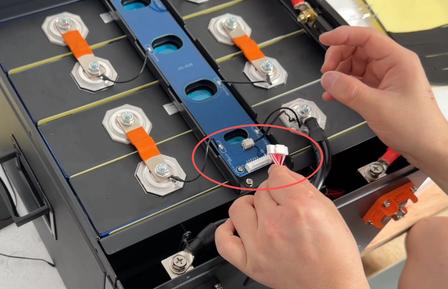
Align balance wire plug before insertion
- Locate the multi-pin balance wire connector running from the JK BMS to the central PCB.
- Line up the pin header perfectly before inserting—even a single offset pin will short and destroy the PCB. Push the plug firmly until fully seated.
- Double-check all cell balance wires are connected to the correct cell studs with a multimeter if available.
Step 8: Close Enclosure & Complete Mechanical Assembly
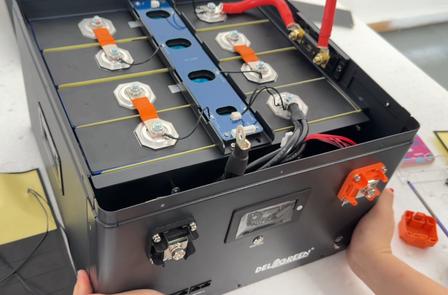
Partially closed battery pack
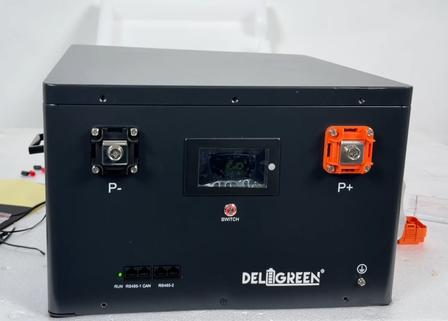
Fully finished sealed unit
- Tidy all internal wiring, fold loose cables neatly into empty side cavities of the enclosure.
- Fasten the full top cover onto the metal housing with all supplied screws, fully sealing the battery box.
- Confirm the front LCD screen, power switch, P+/P- terminals, and RS485 ports are all accessible externally.
Step 9: JK BMS Mobile App Setup & Parameter Configuration
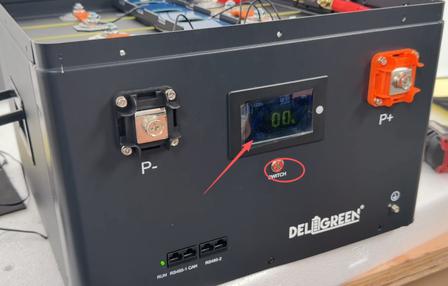
Active LCD screen after power-on
- Press the front panel power switch to boot the BMS and LCD display.
- Download the official JK BMS mobile app and connect via Bluetooth.
- Login credentials:
- Bluetooth connection password:
1234 - Parameter modification authorization password:
123456
- Bluetooth connection password:
- Set core battery parameters to match your 12V 628Ah pack:
- Cell series count: 4S (standard 12.8V LiFePO4)
- Rated battery capacity: 628Ah
- Verify all four cell voltages display evenly on the app screen before putting the battery into charge/discharge use.
Final Post-Assembly Checklist
✅ All busbar and main cable terminals torqued tight
✅ No exposed bare metal or reversed wiring
✅ NTC temperature sensor secured to pack negative cell
✅ Fuse fully installed on positive high-current path
✅ Balance PCB connector fully aligned and locked
✅ LCD screen, power switch, and communication ports functional
✅ JK BMS app correctly set to 4S / 628Ah rating
Who Is This 12V 628Ah Kit For?
This prefabricated assembly kit removes the biggest pain points of DIY lithium builds: custom enclosure fabrication, sourcing matching BMS and busbars, and complicated insulation design. It’s ideal for:
- Off-grid solar home energy storage
- Large RV, camper, and marine battery banks
- Commercial 12V backup power systems
- Heavy-duty industrial low-voltage power supply
LiFePO4 chemistry delivers 6,000+ deep cycle life, far superior to lead-acid alternatives, and the integrated JK smart BMS provides cell balancing, overcharge/over-discharge protection, temperature cutoff, and real-time mobile monitoring for maximum safety and lifespan.
Closing Thoughts
Building a high-capacity 12V lithium battery no longer requires advanced electrical fabrication skills with this complete DELGREEN kit. Following the insulation, wiring, and torque steps in this guide guarantees a stable, safe battery pack that will power your off-grid systems for years. Always prioritize polarity checks and proper insulation during assembly—these small steps prevent costly component damage and safety hazards down the line.
If you’re new to LiFePO4 DIY builds, start slow, double-check every wiring connection, and take advantage of the JK app’s real-time cell monitoring to validate your assembly before full load testing.
Blog Tags
#LiFePO4DIY #12VBattery #OffGridSolar #JKBMSTutorial #RVPower #DIYBatteryPack #628AhBattery #LithiumStorage